
Creating Pages
One of the things I like about Weebly is that it's so easy to create new pages. There is a tab at the top of the screen (just above the row of template options that you see in the image above) labeled "Pages." To create new pages for my website, I simply click that tab and then click the "+Add Page" button near the top of the screen.
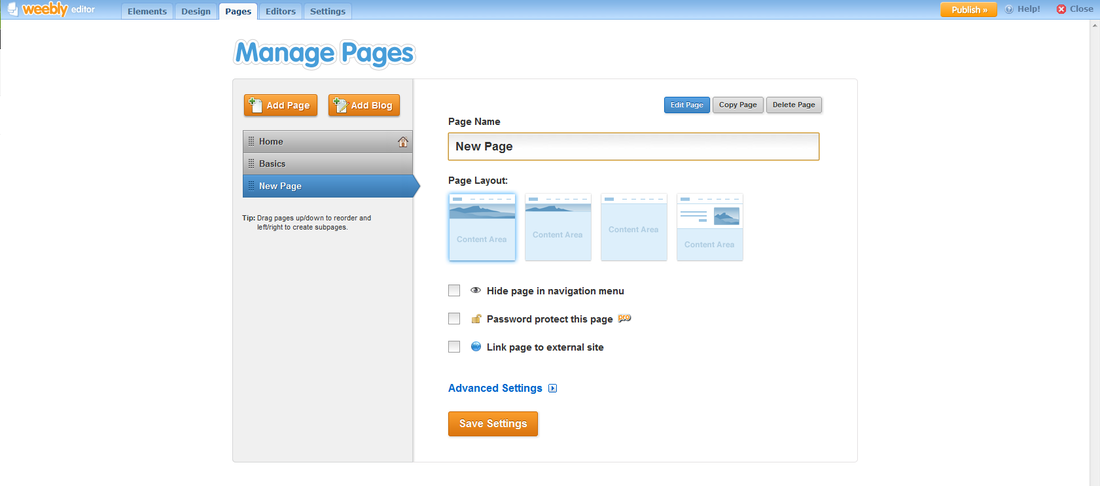
The screen shot above is what the screen looks like when you are adding pages. As you can see, clicking the "Add Page" button will create a new page called "New Page," and will put that new page in order down the left side of the page.
Naming Your Pages
Naming the new page is as easy as highlighting the words "New Page" in the Page Name field and typing a new name there. The way you type text into this field is exactly the way it will look on your website, so pay attention to spelling and capitalization. Don't sweat the page names you choose too much. You can change your page names at any time. If you had linked to that page, the link will change automatically when you save the changed name.
Page Layout and Other Options
You can select the page layout from the four options on the page (you have the option to include images and text in different ratios or text only). You can also make the page "secret" by hiding the page in the navigation menu. This will be a page that you'll have to know the address of before you can get to it (you would have to specifically type the address, or url, of the page into the address bar to get to the page).
Advanced Settings
The Advanced Settings area will allow you improve the Search Engine Optimization (or SEO) of the page by adding keyword-rich page titles, descriptions, meta tags, etc. Adding information into these fields will give additional information to search engines that will help your website get found when specific keywords are used in a search. SEO can get very complicated, and this is not the place to go into a discussion on SEO, but adding these elements in the Advanced Settings area will definitely help you if you're looking for web traffic to your website.
My advice is to simply create the pages and then come back when you're done adding all pages and add the content for each page in the Advanced Settings for each page. I recommend this because your page content, titles, or keywords can change while you're building your website. It's all a part of putting it together and realizing that you need to split out content to other pages or focus on something other than you had originally planned. You'll also want to indicate keywords that you used frequently in each page in your Advanced Settings, and you can't know what those will be until you finish your content for each page. We'll discuss filling in this information later.
My advice is to simply create the pages and then come back when you're done adding all pages and add the content for each page in the Advanced Settings for each page. I recommend this because your page content, titles, or keywords can change while you're building your website. It's all a part of putting it together and realizing that you need to split out content to other pages or focus on something other than you had originally planned. You'll also want to indicate keywords that you used frequently in each page in your Advanced Settings, and you can't know what those will be until you finish your content for each page. We'll discuss filling in this information later.
Organizing and Saving Pages
Before you save your page, decide where you would like for it to be in your menu. The page order down the left side of the page will be the order that the pages are displayed in all menus on your website. If you want this new page to be listed between "Home" and "Basics," you can drag the page bar up and drop it right between "Home" and "Basics."
You can also drag a page to the right to nest it under another page to create a drop-down list on your website. Some of the themes have limited space in the menu bar (like this one) so you will have to create hierarchies of pages and categorize them into drop-down menus.
When you've got everything the way you want it (for now), click the Save Settings button and your new page is created! You can then begin dragging and dropping content into the pages. That's what we'll discuss next.
Click here to go to the Next Step.